Tuesday 25 September 2012

Asp-net-linq-jquery-json-ajax


In this article we will be looking at a different type of architecture. One in which we utilize jQuery's ability toeasily transfer data (via Ajax and JSON) from the client to the server. We then use ASP.NET and LINQ to SQL to query the database and return a collection of data which gets (automatically) serialized to JSON and sent to the client. The benefits of combining these technologies include: more responsive applications, more processing on the client, less processing on the server and reduced network traffic. Everything runs faster and uses fewer resources.
Still not convinced? Here are some additional benefits of this architecture:

Benefits of the Architecture

  1. Unlike an ASP.NET UpdatePanel we only pass what we need; we only receive what we need. We don’t pass ViewStates, in fact we don’t even have a ViewState. We also don’t pass entire HTML chunks and receive HTML chunks we don’t use. For more on this; read: Why ASP.NET AJAX UpdatePanels are dangerous.
  2. By using jQuery to call the web service directly, we’ve eliminated over 100 KB of JavaScript and three extra HTTP requests that's included when you use ASP.NET Ajax.
  3. Less dependencies – because all our code is simply xHTML we could switch to a PHP or a Java backend and none of our code for the UI would have to change. That's right, there are no server-controls; that means no GridViews, no Repeaters, no ListViews, nothing that uses runat server will be found on the page. Not even a ScriptManager.
  4. Usability – We can create RIA interfaces AND maintain usability, giving us the best of both worlds.
  5. Cross-Browser friendly – We use nothing but xHTML code and jQuery which works across browsers.
  6. The entire presentation for the UI is done via CSS. Change the CSS and the entire UI can look different.
  7. We maintain a 'Separation of Concerns' - this means we have 3 distinct and wholly separate code bases. A content or HTML level. A presentation or CSS level and a behavior or JavaScript level. We don't have code mixed together in a web-page jambalaya.
  8. Switching architectures from Web Forms to MVC is a breeze.
Hopefully you are salivating at these benefits enough to decide to get your feet wet and follow along.
In this article will be leveraging these technologies to build a grid (or what looks like a table). Later on, in future articles, I will then show you how to implement sortingpaging and filtering on the grid. I have divided this article up into four sections: 1. Sever-side code (ASP.NET). 2. HTML 3. jQuery and lastly CSS.

ASP.NET

In this article I will be using LINQ to SQL to query the database and return a collection. LINQ to SQL allows you to model a relational database using .NET classes. You can then query the database using LINQ, as well as update, insert and delete data from it. LINQ to SQL fully supports transactions, views, and stored procedures. If you're not familiar with LINQ then I will refer you to these articles: Using LINQ to SQL (Part 1) and LINQ to SQL - 5 Minute Overview.
The goal of this article is not to teach you LINQ. But I will say that if you are not using LINQ and you are still using a DataReader or DataSet to access your data then shame on you. Simply put, I believe LINQ is the coolest technology Microsoft has come out with in recent years.
And the best news is, it's EASY to use. Let's look at the code:
C#:
  1. public class CourseReservations
  2. {
  3.     public long CourseId { get; set; }
  4.     public string Course { get; set; }
  5.     public string Time { get; set; }
  6.     public int Holes { get; set; }
  7.     public int Golfers { get; set; }
  8.     public string FirstName { get; set; }
  9.     public string LastName { get; set; }
  10. }
  11.  
  12. [WebMethod]
  13. public List<CourseReservations> GetGolfCourseReservations()
  14. {
  15.     using (DataContext dc = new DataContext())
  16.     {
  17.         var query = from res in dc.GolfReservations
  18.                     where res.CourseId == 1
  19.                     select new CourseReservations
  20.                     {
  21.                         CourseId = res.CourseId,
  22.                         Course = res.GolfCourse.CourseName,
  23.                         Time = res.DataAndTime.ToShortTimeString(),
  24.                         Holes = res.Holes,
  25.                         Golfers = res.Golfers,
  26.                         FirstName = res.Aspnet_User.GolfUser.FirstName,
  27.                         LastName = res.Aspnet_User.GolfUser.LastName,
  28.                     };
  29.  
  30.         return query.ToList();
  31.     }
  32. }
The first thing we do is create a class called CourseReservations. This class contains all the properties we will need to create our grid on the client. In other words, these will become our columns. The next part is our LINQ statement. This code uses LINQ query syntax to retrieve a sequence of GolfReservations for a given course. Note how the code is querying across the GolfReservations / GolfCourse / Aspnet_User / GolfUser relationships to retrieve all the data we need from our tables, and we didn't have to write any SQL filled with JOINS to do it.
We then return a list of CourseReservations. What's important to note is that our list will get automaticallyserialized to JSON. How fantastic is that? Before we move on, also note the name of our method:GetGolfCourseReservations(). This is what we will call via Ajax using jQuery.

HTML

HTML:
  1. <ul id="reservationsList" class="stripedList"></ul>
That's right, just a simple unordered list with an id of "reservationsList" and class of "stripedList". We don't use any controls, nothing with runat="server" will be found on the page. This way we don't have any ViewState taking up load time, nor do we have Microsoft inserting JavaScript into our page without our consent. Our page, at least on the front-end, is devoid of ASP.NET or any other language. Nothing but pure HTML. If we ever have to port to PHP or JSP we wouldn't have to change a single thing on the UI side.

jQuery

Let's look at the jQuery code now. Bit by bit.
JAVASCRIPT:
  1. //Ajax
  2. function SendAjax(urlMethod, jsonData, returnFunction) {
  3.     $.ajax({
  4.         type: "POST",
  5.         contentType: "application/json; charset=utf-8",
  6.         url: urlMethod,
  7.         data: jsonData,
  8.         dataType: "json",
  9.         success: function(msg) {
  10.             // Do something interesting here.
  11.             if (msg != null) {
  12.                 returnFunction(msg);
  13.             }
  14.         },
  15.         error: function(xhr, status, error) {
  16.             // Boil the ASP.NET AJAX error down to JSON.
  17.             var err = eval("(" + xhr.responseText + ")");
  18.  
  19.             // Display the specific error raised by the server
  20.               alert(err.Message);
  21.         }
  22.     });
  23. }
Notice the SendAjax() method's signature. It takes three parameters, the first urlMethod is the path to the Web Service followed by the name of the Web Method. It should look something like "webservice.asmx/webmethod". The second parameter jsonData will be exactly that, your JSON data. More on this later. The final parameter returnFunction will be the function you wish to call after the return trip from the server.
The $.ajax() method performs an asynchronous HTTP (Ajax) request. You can read all about it here, but for now, just know it's the liaison for the client / server relationship; or the Ajax call.
We will use this light, but powerful SendAjax() method over and over again each time we wish to go to the server.
JAVASCRIPT:
  1. //Stripe the rows
  2. function StripeRows(list) {
  3.     $(list).find('li').removeClass('evenRow');
  4.     $(list).find('li:even').addClass('evenRow');
  5. }
This function is simply used to stripe the rows. Every other row will be colored differently in our grid. You pass it a list, it then finds all the list items in that list and removes a class. It then adds a class to all the even list items. The reason why I removeClass() from all list items first is so that if you ever add or remove list items (dynamically) to the grid you don't get them all messed up colorwise.
JAVASCRIPT:
  1. //This fires when the DOM is ready
  2. //So this starts the ball rolling...
  3. $(document).ready(function() {
  4.     GetGolfCourseReservations();
  5. });
If you are new to jQuery then you need to start by understanding $(document).ready(). You can read all about it here. But the bottom line is that everything inside this method will load as soon as the DOM is loaded and before the page contents are loaded. This is extremely efficient because we don't have to wait for images or content to load, just the DOM elements. Again, if you are new to jQuery start by understanding the $(document).ready() method.
We are telling it to call the method GetGolfCourseReservations() as soon as browserly possible.
JAVASCRIPT:
  1. function GetGolfCourseReservations()
  2. {
  3.     //Ajax
  4.     var urlMethod = "ws_Reservations.asmx/GetGolfCourseReservations";
  5.     var jsonData = '{}';
  6.     SendAjax(urlMethod, jsonData, ReturnGetGolfCourseReservations);
  7. }
  8. function ReturnGetGolfCourseReservations(msg) {
  9.     var listItems = "";
  10.  
  11.     $.each(msg.dfunction(key, val) {
  12.             listItems += "<li>" +
  13.                 "<span class='c1'>" + val.Time + "</span>" +
  14.                 "<span class='c2'>" + val.FirstName + "</span>" +
  15.                 "<span class='c2'>" + val.LastName + "</span>" +
  16.                 "<span class='c3'>" + val.Course + "</span>" +
  17.                 "<span class='c4'>" + val.Holes + "</span>" +
  18.                 "<span class='c4 cLast'>" + val.Golfers + "</span>" +
  19.                 "</li>";
  20.         }
  21.     );
  22.  
  23.     $("#reservationsList").html(listItems);
  24.     StripeRows('#reservationsList');
  25. }
The three lines in the GetGolfCourseReservations() method will become very familiar to you in this methodology. Recall that urlMethod is the path to your web service and your web method. You do remember our .asmx file contains a web method called GetGolfCourseReservations? Good. The next line with jsonData is the JSON that we are passing in. Note that if you are not passing any data, as we are in this case, you must still have the empty curly brackets. Finally, the third line is our call to SendAjax() method. Notice the third parameter: ReturnGetGolfCourseReservations. This is the method to be called on the round trip from the server. Conveniently you will find this function one line down. I always keep to this standard.
In our ReturnGetGolfCourseReservations method we loop through the returned JSON and create our rows or list items. We then drop our list items into our unordered list and lastly call our method to strip the rows.
TIP: Two tools that are indispensable for this methodology are Firebug and this JSON checker. Without Firebug you will not get far. It allows you to see all your Ajax calls, the post, the request and the returned JSON. Get it and learn it.

CSS

Lastly, let's look at the CSS involved to make our grid look pretty. Do note that we could have used a table instead of a list very easily. It's your choice.
CSS:
  1. <style type="text/css">
  2. #reservationsList {width:500px; max-height:600px; background:#fff; overflow:auto;}   
  3.  
  4. /*STRIPE LIST*/   
  5. ul.stripedList {
  6.     margin:0;
  7.     padding:0;
  8.     list-style:none;
  9. }
  10. .stripedList li {
  11.     display:block;
  12.     text-decoration:none;
  13.     color:#333;
  14.     font-family:Arial,Helvetica,sans-serif;
  15.     font-size:12px;
  16.     line-height:20px;
  17.     height:20px;
  18. }
  19. .stripedList li span {
  20.     display:inline-block;
  21.     border-right:1px solid #ccc;
  22.     overflow:hidden;
  23.     text-overflow:ellipsis;
  24.     padding:0 10px;
  25.     height:20px;
  26. }
  27. .stripedList .evenRow {background:#f2f2f2;}
  28.  
  29. .c1 {width:55px;}
  30. .c2 {width:70px;}
  31. .c3 {width:130px;}
  32. .c4 {width:15px;}
  33. .cLast {border:0 !important;}
  34.  
  35. </style>
Most of the CSS is pretty straight forward; we stylize our list-items and use spans as our cells. The classes .c1, .c2 ect. allow us to assign a width to each column.

The Take Away

What I really want you to take away from this article is all the benefits gathered from this methodology. When I build Web-based apps the thing at the front of my mind is speed. It's all about speed. Nobody likes to wait for anything these days, on the web or off. This is about as fast as you can do things. In addition, we have nice clean code that adheres to the separation-of-concerns. On the front is just good old HTML, probably the first thing you learned when creating websites. On the back-end is our Web Service that does our actionable request: get, save, update and delete. That's all it does, it knows nothing about the UI, unlike a typical ASP.NET page with its CodeBehind page that is all aware of the UI and talks to it. If we ever had to change over to an Apache server and use PHP we wouldn't have to change a thing on the front-end, simply our methods on the back-end would change.
We allow our CSS file to control the way the entire application looks. Once again, compare this to many typical ASP.NET apps that use Web Controls and want you to set presentation properties either in the .aspx page or the CodeBehind page. Yuck. Never do that.
Lastly, not only is our code fast and clean, but it's also lean. When you get good at this methodology there is usually a lot less code. Less code is always a good thing.

Why do ASP.NET AJAX page methods have to be static?


However, it is an important question, the answer to which is important to understand. So, in an attempt to fill in this gap for the searchers and perhaps preemptively help others, I want to proceed to answer it as thoroughly as possible without overly complicating the whole business.
In order to do this, we’ll have to take a brief tour of WebForms, including:
  • Understanding what the Page class is, and why we have it.
  • One specific thing that the Page class does for us.
  • How this is accomplished, behind the scenes.
  • What the static keyword entails, when used with a method.
  • Finally, why page methods must be static.
Note: Please bear in mind that I have taken great liberties in simplifying these concepts down to only what is necessary to answer the central question. What I will show you is conceptually accurate, but some of the implementation details are much more complex than what you will see here.

Understanding what the Page class is, and why we have it

Contorting the stateless HTTP protocol to accommodate ASP.NET’s WebForm paradigm was a considerable task for the ASP.NET team to accomplish. On top of that, going from the inline execution model of ASP classic to the event-driven model of ASP.NET also required major changes.
As such, the ubiquitous WebForms Page class was created to solve these various problems. Take this snippet, for example:
public partial class _Default : System.Web.UI.Page 
{
  protected void Page_Load(object sender, EventArgs e) 
  { 
    // Hello World.
  }
}
I’m sure you’re familiar with the Page_Load event. The very first ASP.NET code example you were exposed to probably involved the Page_Load event. How about this portion of it though?
public partial class _Default : System.Web.UI.Page
To get you started quickly, those examples may not have explained that part very well (if at all). Later, after you get up and running, it can be easy to simply gloss over this line as cruft that comes with writing an ASP.NET page.
What this declaration means is that your code extends the Page class. Because of this, your code will include the functionality of the entire ASP.NET Page class, instead of standing on its own and requiring you to implement the mundane details.
If you’re more familiar with something like ASP classic or PHP, you can think of this Page inheritance as being functionally similar to a powerful include file that you use site-wide.

One of the Page’s most powerful features: Persistence

The Page brings a lot to the table. However, to answer the question of why page methods must be static, we need to focus on persistence.
Consider this example:
<asp:Label runat="server" id="Label1" />
<asp:Button runat="server" id="Button1" OnClick="Button1_Click" />
protected void Button1_Click(object sender, EventArgs e)
{
  Label1.Text += DateTime.Now.ToString();
}
Each time the button is clicked, the label will have the current time and date appended to its current contents. Even this elementary example illustrates how the WebForms Page automatically provides persistence for us.
We take for granted that the Page will provide us this Label1 object after an HTTP POST from the browser. We also assume that it will automatically have a Text property with that Label’s current value.
However, this data would not normally be included in the POST data sent to the server. Only form elements are sent from the browser. The Label renders as a span element, which means that its state is not POSTed by the browser.
So, how does the Page provide us with this data anyway? Persistence.

Understanding how the Page does this

To implement this encompassing layer of persistence, the ViewState was created.
Each time a page is rendered to the browser, the Page serializes the state of its controls and then includes that information in the returned HTML, via a hidden form field named __ViewState. When a postback occurs, this hidden field can then be de-serialized to create an instance of the Page in the same state that it was at the end of the last request.
Oversimplifying, you can envision this constructor being used to re-instantiate the Page, at the beginning of every postback:
Page _Default = new Page(Request["__ViewState"]);
In our example above, the Page created through that process would look something like this after one postback:
This re-instantiation of the Page from the ViewState is what keeps the entire WebForms machine rolling, postback after postback.

What does it mean that a method is static?

A static method is simply one that is disassociated from any instance of its containing class. The more common alternative is an instance method, which is a method whose result is dependent on the state of a particular instance of the class it belongs to.
For example, both of these statements would return precisely the same string, but accomplish it through different types of methods:
// ToString() is an instance method of the DateTime class.
//  Its result depends on the value of each DateTime instance.
return DateTime.Now.ToString();
 
// String.Format is a static method of the String class.
//  Its result is not related to any instance of the String.
return String.Format("{0}", DateTime.Now);
The key difference to understand is that a static method can be called withoutsetting up a proper instance of the class it belongs to.
In a sense, it is a stateless method.

So, why do page method calls have to be static?

If you’re implementing page methods, you’re probably well aware of their excellent performance. They are especially performant compared to the UpdatePanel’s partial postbacks.
They are efficient largely because they do not require the ViewState to be POSTed and they do not create an instance of the Page, while partial postbacks do both of these things. As we now know, a page method couldn’t create an instance of the page even if desired, since the ViewState isn’t provided in the request.
This is exactly why they must be marked as static. They cannot interact with the instance properties and methods of your Page class, because a page method call creates no instance of the Page or any of its controls.
Page methods are roughly equivalent to shorthand for standalone web services. In fact, the ScriptManager even calls them exactly as it would a regular web service.

Conclusion

While forcing the page method to be static is primarily due to technical reasons, I would suggest that it’s actually a good thing. If page methods transmitted the ViewState along with their request, in order to instantiate the Page, they would immediately lose a majority of their benefit.
Forcing the method to be static is necessary to confer most of the benefits of using page methods. Sure, it would be nice to be able to access control properties directly from within page methods, but not at the expense of transmitting volumes of extraneous data about every other control on the page.
Instead of fighting against this limitation, I say embrace efficiency.

Why ASP.NET AJAX UpdatePanels are dangerous


Unfortunately, that very lack of transparency regarding the mechanics of the client/server exchange makes it all too easy to shoot yourself (or your application) in the foot. Let me give you an example that you’re probably familiar with by now, and thoroughly sick of seeing:
<asp:ScriptManager ID="ScriptManager1" runat="server" />
<asp:UpdatePanel runat="server" ID="up1">
 <ContentTemplate>
   <asp:Label runat="server" ID="Label1" Text="Update Me!" /><br />
   <asp:Button runat="server" ID="Button1" 
     Text="Postback Update" OnClick="Button1_Click" />
 </ContentTemplate>
</asp:UpdatePanel>
protected void Button1_Click(object sender, EventArgs e)
{
  Label1.Text = DateTime.Now.ToLongDateString();
}
Simple enough. Button1 is clicked, an asynchronous request is made for the current date/time, and that is displayed as Label1′s content. As simple as it sounds, take a look at the actual HTTP post and response necessary to accomplish the partial postback:
UpdatePanel's Post Request
UpdatePanel's Response
Shocking, isn’t it? To display a 22 character string, that’s an awful lot of data sent and received. Acceptable for infrequently used functionality, but a potential deal breaker in heavy use. Luckily, Microsoft has given us a more efficient way to do this, as part of the ASP.NET AJAX framework.

Page Methods

Page methods allow ASP.NET AJAX pages to directly execute a page’s static methods, using JSON (JavaScript Object Notation). JSON is basically a minimalistic version of SOAP, which is perfectly suited for light weight communication between client and server. For more information about how to implement page methods and JSON, take a look at Microsoft’s Exposing Web Services to Client Script in ASP.NET AJAX.
Instead of posting back and then receiving HTML markup to completely replace our UpdatePanel’s contents, we can use a web method to request only the information that we’re interested in:
<asp:ScriptManager ID="ScriptManager1" runat="server" 
  EnablePageMethods="true" />
<script language="javascript">
 function UpdateTime() {
   PageMethods.GetCurrentDate(OnSucceeded, OnFailed); 
 }
 
 function OnSucceeded(result, userContext, methodName) {
   $get('Label1').innerHTML = result; 
 }
 
 function OnFailed(error, userContext, methodName) {
   $get('Label1').innerHTML = "An error occured.";
 }
</script>
<asp:Label runat="server" ID="Label1" Text="Update Me!" /><br />
<input type="button" id="Button2" value="Web Method Update" 
  onclick="UpdateTime();" />
[WebMethod]
public static string GetCurrentDate()
{
  return DateTime.Now.ToLongDateString();
}
Through this method, we’ve completely eliminated the HTTP POST data that was present in the UpdatePanel’s request, and reduced the response down to just the data we’re interested in requesting:
JSON Response
Using JSON, the entire HTTP round trip is 24 bytes, as compared to 872 bytes for the UpdatePanel. That’s roughly a 4,000% improvement, which will only continue to increase with the complexity of the page.
Not only has this reduced our network footprint dramatically, but it eliminates the necessity for the server to instantiate the UpdatePanel’s controls and take them through their life cycles to render the HTML sent back to the browser.
While I’m a proponent of the simplicity inherent in the UpdatePanel, I think that it is crucial that we use them judiciously. In any heavy use situation, they are very rarely the best solution.


Monday 24 September 2012

Programmatically uploading videos to YouTube using C#

Recently I spent some time investigating the Google Data .NET Client library. Specifically, I was interested in the YouTube Data API. What I wanted to do was programmatically upload a video file to my YouTube account. I ran into a couple of (minor) speed bumps along the way, and noticed there were a few things that weren't as clear as they should have been. Hopefully I can clarify the problems I encountered, in case future developers run into the same trip ups. Let's get started.

For the context of this post, I should explain my development environment. I am using the following:

  • Windows 7 Professional (32-bit)

  • Visual Studio 2008 Professional SP1

  • .NET 3.5 SP1

  • ASP.NET MVC 1.0

OK, so we're going to set up a very basic ASP.NET MVC web site that will basically do two things: 

  • Provide a link to use for authenticating a Google Account

  • Provide a form to direct upload a video (including metadata)

First things first: download the most up to date version of the Google Data .NET Client library and follow the instructions for installing and setting it up.

Next, ensure you have a YouTube developer API key attached to your YouTube account. If you have not done this yet, go here and associate a Developer ID with your account. Take note of this ID (it's pretty long).

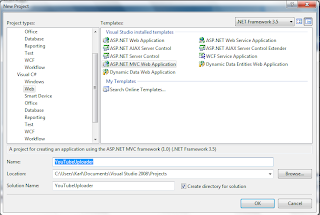
Now, let's set up a new ASP.NET MVC project. We're going to use the Visual Studio defaults here, and just name our project "YouTubeUploader". 


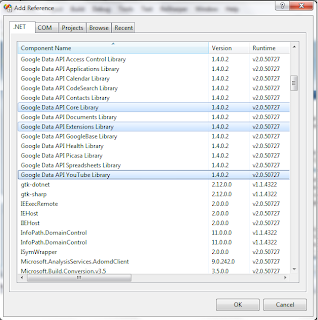
Next, we need to add some references to the Google APIs. When you install the Google Data API, there should be a solution at All Programs -> Google Data API SDK -> Google Data API SDK.sln that the setup guide tells you to open and build. Once you have done this, you can select these binaries as a reference in your current project, which is what we do here.


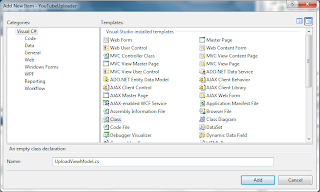
Next, we're going to create a ViewModel to encapsulate all the inputs required to pass to our video uploader. This is going to be a very basic ViewModel, with nothing more than properties for retrieving inputs for our video. Here's what the code looks like:


  1. namespace YouTubeUploader.Models  
  2. {  
  3.     public class UploadViewModel  
  4.     {  
  5.         public string Title { getset; }  
  6.         public string Keywords { getset; }  
  7.         public string Description { getset; }  
  8.         public bool Private { getset; }  
  9.         public string VideoTags { getset; }  
  10.         public double Latitude { getset; }  
  11.         public double Longitude { getset; }  
  12.         public string Path { getset; }  
  13.         public string Type { getset; }  
  14.     }  
  15. }  

Like I said, very basic ViewModel here.

Next, we need to add a controller method to handle our Login logic. For simplicity sake, we're going to use the HomeController for all of our methods here. In your production situation, however, this logic might be split apart into different modules. We're just going for the basic "Hello, World" functionality here. In order to successfully make YouTube API calls (or any Google Data API, for that matter) you must retrieve an authenticated session token from the Google servers. This can be accomplished a number of different ways. Since we're trying to make a web site here, we're going to go with the AuthSub method of Google authentication. Here, we're going to provide a link to our user where they can go and authenticate themselves with the Google servers, send back a session token, and then finally re-direct the user back to a page of our choosing. This token is returned as part of the request query string, which we can handle in a number of different ways. For our purposes, we are going to use a string parameter on one of our controller methods to take the parameter and use it to create an authenticated session token in memory. The method will look like this: 
(NOTE: throughout the post, I reference "http://localhost:50555/" as my development server. I am just running my site through Visual Studio 2008 and am taking the default server address provided. This may vary in your environment, so please replace this address for what your environment requires.)
  1. public ActionResult Login()  
  2.        {  
  3.            Session["authSubUrl"] = AuthSubUtil.getRequestUrl("http://localhost:50555/Home/Upload""http://gdata.youtube.com"falsetrue);  
  4.   
  5.            return View();  
  6.        }  

What we're doing here is using a Google utility (AuthSubUtil.getRequestUrl) to generate the text for our link to provide to our users. getRequestUrl takes the following parameters:

  • continueUrl: Where the user will be redirected after authenticating. For our example, I used my local development server (http://localhost:50555/Home/Upload) since I want to pass my authenticated session token into my Upload GET method...more on that next.

  • scope: for YouTube API calls we use http://gdata.youtube.com

  • secure: If you have registered your app with Google with the appropriate security credentials, you can set this to true to ensure that your API requests do not show the "Warning: Access Consent" verbiage after authenticating. Also, some API calls are not allowed unless your app is registered. For our testing, we send in false.

  • session: Whether the authenticated token should persist over multiple API calls or just be a "one-time-only" shot. This becomes very clear when we actually create our YouTubeRequest object.

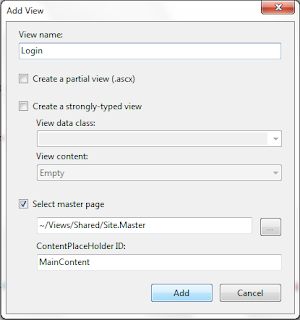
Next we add a view for our Login page. It's going to be a very generic view, with only one link on the page. Here is the whole view:


  1. <%@ Page Title="" Language="C#" MasterPageFile="~/Views/Shared/Site.Master" Inherits="System.Web.Mvc.ViewPage" %>  
  2.     <asp:Content ID="Content1" ContentPlaceHolderID="TitleContent" runat="server">  
  3.      Login  
  4.     </asp:Content>  
  5.     <asp:Content ID="Content2" ContentPlaceHolderID="MainContent" runat="server">  
  6.         <h2>Login</h2>  
  7.         <a href="<%= Session["authSubUrl"] %>">Click here to login</a>  
  8. </asp:Content>  

Notice how we are retrieving the URL text from Session["authSubUrl"], which we set in our Login() method. You could just as easily encapsulate this value into a ViewModel, however, I felt for the type of exercise we're performing here, this was sufficient.

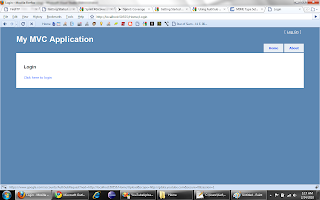
Let's compile our project now and run our website. What you see when you navigate to http://localhost:/Home/Login is similar to the following:


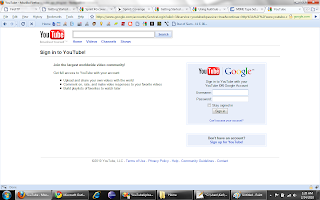
The link brings us to a very familiar page to anyone with a Google account:


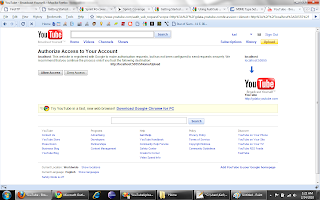
Once the user has entered their credentials, the following screen shows up:


This is the warning I mentioned previously about a secure application. If you secure your site with Google, the verbiage here (according to the documentation) is omitted. I have not yet secured a site with Google yet, so I have not experienced this difference.

After clicking on "Allow Access", we're presented with the following screen:


D'oh! We don't have an Upload view or controller method yet to handle this redirect! This is what we will create next. Take a look at the URL that Google navigated to post-login.http://localhost:50555/Home/Upload?token=CPvdxbuhGRDovLiXBw That looks awfully similar to what we specified in our Login() method, doesn't it? And you can see the authenticated token in the QueryString at the end of our URL. 

Next we add a controller method to handle GET requests to our Upload page. This is where we are going to handle binding our session token into a YouTubeRequestSettings object, and we'll use that to build a YouTubeRequest object, which is how we'll interact with the YouTube Data API. The method looks like this:
  1. public ActionResult Upload(string token)  
  2. {  
  3.     Session["token"] = AuthSubUtil.exchangeForSessionToken(token, null);  
  4.   
  5.     return View();  
  6. }  

Ok, what we're doing here is handling the QueryString token we get back from Google as a part of the GET request by making sure our method has a string parameter (which we call token). The method then uses a method on AuthSubUtil called exchangeForSessionToken which takes a string and an AsymmetricAlgorithm and returns a token good for an entire user session. This way we only have to authenticate the user once per session and they can make as many API calls as the system allows. Since we are not using a secured certificate for authentication we are leaving this as a null parameter. However, if you choose to use this functionality in a production environment I highly suggest taking a look at the documentation on registering your app with Google to take advantage of the heightened security. As this is a simple exercise, we are omitting this.

Next we add a strongly typed view (Create) for our Upload logic (UploadViewModel). We are going to choose "Create" template from the dropdown, and our view comes out like so:


  1. <%@ Page Title="" Language="C#" MasterPageFile="~/Views/Shared/Site.Master" Inherits="System.Web.Mvc.ViewPage<YouTubeUploader.Models.UploadViewModel>" %>  
  2.     <asp:Content ID="Content1" ContentPlaceHolderID="TitleContent" runat="server">  
  3.      Upload  
  4.     </asp:Content>  
  5.     <asp:Content ID="Content2" ContentPlaceHolderID="MainContent" runat="server">  
  6.         <h2>Upload</h2>  
  7.         <%= Html.ValidationSummary("Create was unsuccessful. Please correct the errors and try again.") %>  
  8.         <% using (Html.BeginForm()) {%>  
  9.             <fieldset>  
  10.                 <legend>Fields</legend>  
  11.                 <p>  
  12.                     <label for="Title">Title:</label>  
  13.                     <%= Html.TextBox("Title") %>  
  14.                     <%= Html.ValidationMessage("Title", "*") %>  
  15.                 </p>  
  16.                 <p>  
  17.                     <label for="Keywords">Keywords:</label>  
  18.                     <%= Html.TextBox("Keywords") %>  
  19.                     <%= Html.ValidationMessage("Keywords", "*") %>  
  20.                 </p>  
  21.                 <p>  
  22.                     <label for="Description">Description:</label>  
  23.                     <%= Html.TextBox("Description") %>  
  24.                     <%= Html.ValidationMessage("Description", "*") %>  
  25.                 </p>  
  26.                 <p>  
  27.                     <label for="Private">Private:</label>  
  28.                     <%= Html.TextBox("Private") %>  
  29.                     <%= Html.ValidationMessage("Private", "*") %>  
  30.                 </p>  
  31.                 <p>  
  32.                     <label for="VideoTags">VideoTags:</label>  
  33.                     <%= Html.TextBox("VideoTags") %>  
  34.                     <%= Html.ValidationMessage("VideoTags", "*") %>  
  35.                 </p>  
  36.                 <p>  
  37.                     <label for="Latitude">Latitude:</label>  
  38.                     <%= Html.TextBox("Latitude") %>  
  39.                     <%= Html.ValidationMessage("Latitude", "*") %>  
  40.                 </p>  
  41.                 <p>  
  42.                     <label for="Longitude">Longitude:</label>  
  43.                     <%= Html.TextBox("Longitude") %>  
  44.                     <%= Html.ValidationMessage("Longitude", "*") %>  
  45.                 </p>  
  46.                 <p>  
  47.                     <label for="Path">Path:</label>  
  48.                     <%= Html.TextBox("Path") %>  
  49.                     <%= Html.ValidationMessage("Path", "*") %>  
  50.                 </p>  
  51.                 <p>  
  52.                     <label for="Type">Type:</label>  
  53.                     <%= Html.TextBox("Type") %>  
  54.                     <%= Html.ValidationMessage("Type", "*") %>  
  55.                 </p>  
  56.                 <p>  
  57.                     <input type="submit" value="Create" />  
  58.                 </p>  
  59.             </fieldset>  
  60.         <% } %>  
  61.  <div>  
  62.   <%=Html.ActionLink("Back to List", "Index") %>  
  63.  </div>  
  64.     </asp:Content>  

This is a very limited view. What we are doing is adding a field for every property on our UpdateViewModel. This allows the user to specify what kind of video they want to upload.

Next we add a controller method to handle the POST request for our Upload page (i.e. what happens when we click "Create"). This is where the bulk of our logic will reside. Here's what the code looks like:
  1. [AcceptVerbs(HttpVerbs.Post)]  
  2. public ActionResult Upload(UploadViewModel uploadViewModel)  
  3. {  
  4.     const string developerKey = "THIS_IS_WHERE_YOUR_REALLY_LONG_DEVELOPER_API_KEY_GOES";  
  5.     const string applicationName = "THIS_IS_WHERE_YOUR_APP_NAME_GOES";              
  6.   
  7.     _settings = new YouTubeRequestSettings(applicationName, "ThisCanSeriouslyBeAnyString_It'sBeenDeprecated", developerKey, (string) Session["token"]);  
  8.     _request = new YouTubeRequest(_settings);  
  9.   
  10.     var newVideo = new Video();  
  11.   
  12.     newVideo.Title = uploadViewModel.Title;  
  13.     newVideo.Keywords = uploadViewModel.Keywords;  
  14.     newVideo.Description = uploadViewModel.Description;  
  15.     newVideo.YouTubeEntry.Private = uploadViewModel.Private;  
  16.   
  17.     newVideo.YouTubeEntry.Location = new GeoRssWhere(uploadViewModel.Latitude, uploadViewModel.Longitude);  
  18.   
  19. wVideo.Tags.Add(new MediaCategory(uploadViewModel.VideoTags, YouTubeNameTable.DeveloperTagSchema));  
  20.   
  21.     newVideo.YouTubeEntry.MediaSource = new MediaFileSource(uploadViewModel.Path, uploadViewModel.Type);  
  22.     var createdVideo = _request.Upload(newVideo);  
  23.   
  24.     return View();  
  25. }  

Ok, so it was this method where I ran into the gotcha's that prompted me to write this post in the first place. Once again, in a production environment, you will probably have the developerKey and applicationName stored in some kind of configuration file / object or a database. For our example, we're just setting some hard-coded strings inside our method. These are used to create our YouTubeRequestSettings object. As you can see, the method takes 4 parameters, and this is the method call that was a pain to debug. The 4 parameters are:

  • applicationName: The name of our application, as specified in our YouTube Account screen, to the left of our developer api key.

  • client: If you look on your YouTube account screen (as of February 24th, 2010) you'll notice thereis not a client id on your screen. In fact, there is verbiage stating that they are no long required.Use any string you want here. Anything. I used "ThisIsMyRidiculouslyLongClientIdStringThatWillWorkJustBecause" and that is fine. It can be anything. I don't know why this hasn't been deprecated yet, but hopefully in the future it does to reduce confusion.

  • developerKey: This is your developer key from your YouTube account page. It's really long, so be sure when you copy / paste it in that you grabbed everything.

  • authSubToken: This is the string version of the AuthSub session token we created in our Login() method.

Once you understand the functionality in setting up your YouTubeRequestSettings object the rest is a walk in the park. The YouTubeRequest object itself takes a YouTubeRequestSettings object as a parameter, so you just new() up one of those with the YouTubeRequestSettings object we just created. Then, we create a new Video() object and set the properties on it equal to the values in our UploadViewModel. This is an ideal situation for AutoMapper in that all we're doing is basically mapping properties from one object to another. However, for this example we are just going to set them explicity ourselves. Then we create a new MediaFileSource object as a property on our Video object. Be sure to escape '\' in your path, if you are using a local path (i.e. instead of C:\MyCode\Project you need C:\\MyCode\\Project). Also, for the Type property, you need the MIME type of the video you are uploading. For example, for Windows Media Video files, you want to use "video/x-ms-wmv" as your type.

And that's it! Let's run the web site now and see our results.

To make this more robust (and actually usable) you'll want to provide some kind of feedback mechanism to notify your user whether the upload failed or was successful. For this example I chose to just prove how to upload the files. 

I hope this eases someone's pain and eliminates the 45 minutes - 1 hour I lost trying to figure out why my API calls weren't being correctly authenticated. Take some time and experiment with the rest of the APIs, which allows you to do pretty much anything you can do on the web site.

What should you required to learn machine learning

  To learn machine learning, you will need to acquire a combination of technical skills and domain knowledge. Here are some of the things yo...